Case Study: Structural Shifting, Cracked Foundations, and Diagnosing Floor Movement in Folsom
Executing a professional shower restoration is often about far more than just fixing cosmetic nuisances; it requires uncovering the profound structural stories hidden behind the tile. When water starts escaping an enclosure, it is almost always a sign of subsurface movement, shifting perimeters, or foundational settling.
A recent client in Folsom reached out after noticing persistent moisture on their bathroom floor. They had tried superficial fixes, but the root cause required a deep diagnostic. This property presented an incredible teaching moment: the intersection of unstable foundation soils, a heavy tile roof, structural settlement, and an installation that was physically moving under pressure. Here is how we used our specialized knowledge to stabilize the shower, engineer around structural movement, and save the client thousands of dollars compared to a complete demolition.
The Diagnostic: Structural Settlement vs. Material Failure
This project required us to look far beyond the tile surface. The original homeowner was highly knowledgeable about the history of the property, which gave us critical context: the house was likely built on improperly compacted, unsound soil. Combined with the immense weight of a heavy concrete tile roof, gravity has spent years pushing down through the framing walls, transferring immense stress directly into the bathroom architecture.
In fact, the foundation itself was cracking, and the bathroom floor had three cracked tiles replaced within the very first year of construction. On this specific Folsom project, our diagnostic tracked this structural stress through three distinct areas:
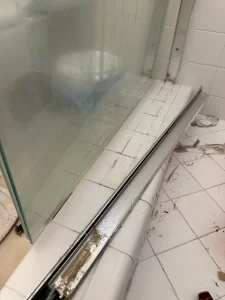
- The Back Wall Shear Line: A distinct structural crack traveled straight down the middle of the back tile wall, mirroring a foundation stress fracture underneath.
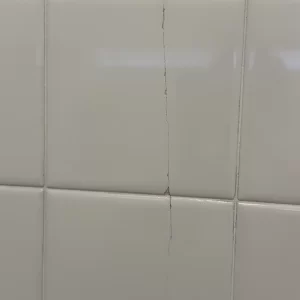
- Stress Cracks Around the Window: The drywall framing surrounding the shower window featured deep stress cracks, proving the wall cavity is actively compressing under structural load.
- Deteriorated Enclosure Seals: Under this constant pressure, the original rigid cement grout lines and perimeter silicone fractured, acting like a funnel that channeled water behind the walls and outside the glass enclosure.
Before Restoration Conditions
Our restoration package includes lower glass channel removal to allow for full mold and fungus remediation.
A severe structural settlement crack splitting down the center of the back wall, caused by foundational shifting and wall compression.
Visible stress fractures in the drywall around the interior window framing, illustrating the immense downward pressure from the heavy tile roof.
Watch the Complete Before & After Transformation
Our 6-Step Shower Restoration Process in Action
To properly address a structurally compromised shower, you cannot just slap new caulking over shifting joints. We executed our meticulous technical protocol to seal the system while keeping its unique structural quirks in mind:
1. Advanced Mold Remediation
Before addressing the visible structures, we applied our commercial-grade remediation agents. This step kills active mold spores on contact, neutralizing subsurface growth hidden deep within the failed grout channels.
2. Mechanical Grout Preparation & Extraction
We completely cut out and ground away the top layer of compromised, soft cement grout. Using specialized stainless steel brushes, we excavated down to a entirely clean, stable substrate, ensuring no underlying mold could contaminate our new materials.
3. Glass Enclosure Restructuring (The Track Pull)
What truly separates us from standard competitors is our thoroughness: we completely remove the bottom track of the glass enclosure. Metal shower tracks are absolute havens for stagnant water and deep mold growth that surface cleaning can never reach. By pulling the track, we sanitize the hidden tile face and prep the channels for a completely pristine rebuild.
4. Drain Alignment & Cleanout
We opened up the drain assembly to clear out soap scum, mineral scale, and hair buildup. Ensuring that the primary drain and sub-drain weep holes flow freely prevents water from backing up and putting pressure on the tile floor boundaries.
5. High-Performance 100% Epoxy Grout Injection
For the shower floor perimeter repair, we bypassed standard cement. We packed the prepped joints with **100% epoxy grout**. The existing shower floor grout was borderline needing a full regrout, but the customer opted to save money by having us structurally seal and secure the critical planes rather than pursuing an extensive teardown. Because epoxy is entirely non-porous and chemically dense, it cannot absorb water, making it structurally superior and highly resilient against future leaks.
6. 100% Silicone Perimeter Seals
With the metal tracks pristine and the tile bone-dry, we reinstalled the framework and sealed all movement joints using premium, high-adhesion 100% silicone. This creates a flexible, completely watertight barrier that stops water from traveling outward.
Completed Restoration Results
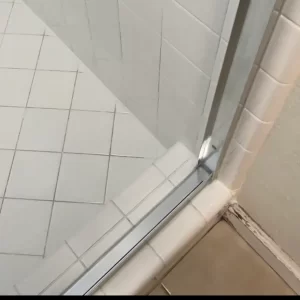
Glass aluminum frame cleaned to a brilliant shine and sealed with clear 100% silicone.
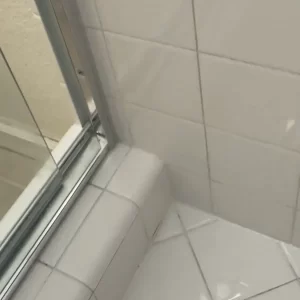
The newly applied premium silicone transitions and solid white epoxy grout lines, completely sealing the shifting floor boundaries.
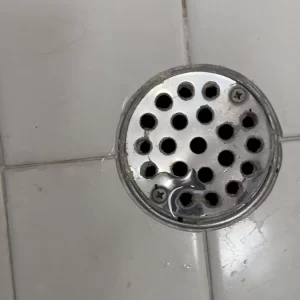
Drain grate removed, weep holes cleaned and ready for years of performance.
The End-of-Day Surprise: Detecting Subsurface Floor Movement
At the very end of the day, while applying the advanced white epoxy grout to the shower floor perimeter, we discovered a major twist. Under the physical weight of my arms pressing down on the floor during application, we detected **slight vertical movement in the actual tile floor at the perimeter joint.**
What does this mean technically? It means either the thick traditional mortar bed or the deck mud beneath the tile has broken free from the underlying hot mop waterproofing membrane and is now free-floating. The historical lack of solid ground stability under the foundation combined with crushing overhead weight is almost certainly the culprit.
Is this an installation failure? Technically, **yes**. However, a structural failure does not always mean an emergency teardown. As long as the hot mop membrane below remains intact, holds water, and keeps moisture inside the shower envelope, a full remodel isn’t immediately required.
Because the client wants to avoid spending a massive sum on a premature gut remodel, the engineering strategy is to monitor it closely. If the floor-to-wall joint experiences excessive shifting, we must adapt our approach:
- The Epoxy Dilemma: High-performance epoxy grout is structurally bulletproof and resists mold beautifully, but it has zero flexibility. If a joint moves, rigid epoxy will eventually crack.
- The Silicone Solution: Premium 100% silicone acts like a rubber band, easily flexing with structural movement without breaking its seal. The catch? Silicone is far more susceptible to surface mold growth if the shower isn’t allowed to dry out completely between uses.
Our Structural Engineering Strategy: We sealed the shifting perimeter with premium materials to secure immediate water protection. Moving forward, if foundation movement forces a split, we will swap the rigid joints for ultra-flexible 100% silicone to act as a structural shock absorber.
Pro Tips for Managing a Shifting Shower
If your home sits on unstable soil or shows signs of structural settlement, your tile maintenance routine requires specific adjustments:
- The Bi-Weekly Flush & Dry: Because a moving floor bed may require flexible silicone transitions, keeping the shower dry is non-negotiable. Spend 5 minutes every two weeks flushing the joints with a grout-safe neutral cleaner, and utilize a quick squeegee or run an exhaust fan to deny mold the moisture it needs to cling to flexible seals.
- Monitor the Floor-Wall Plane: Once a month, take a close look at the perimeter joint where the floor meets the wall. If you see hairline fractures appearing in the grout line, it’s a sign that structural movement is active and it’s time to bridge that joint with a rubberized 100% silicone transition.
- Watch the External Threshold: Keep a close eye on the drywall and flooring immediately outside the shower enclosure. Catching subtle structural water migration early protects your home’s framing before it requires catastrophic structural remediation.
For more detailed maintenance strategies or to look up specific product recommendations that keep your restored tile looking like new, visit our comprehensive FAQ Section.